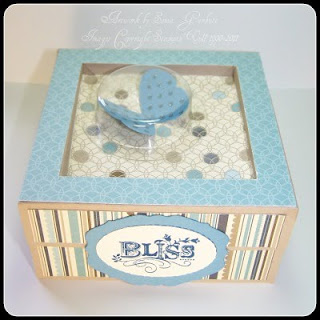
This is the project I created for Inkspirations 4U. It's a cute 3" square pizza box, with a recessed lid. I nearly forgot to show it to you! How silly of me! I just loved this Sale-A-Bration set! I honestly don't know how I am going to work without it in the future! Oh that's right, there are heaps of yummy new products coming.... Be sure to come back to check out the new products tomorrow! Till next time, happy stamping...
Thursday, March 31, 2011
Inkspirations - Sonia style
I am hoping that my formatting will behave today... but no telling until I type a few lines and hit preview. I've checked it out and it's misbehaving again... Grrrr! I'll try and perservere and get something up here for you.... however it may be short and sweet!
Wednesday, March 30, 2011
Black Bliss 411
Anyway this sketch is the current one for the Stamping 411 site. Isn't it just great? I decided to mix it with our weekly challenge at Stampin_Up_In_Oz, which is Black Magic
Tuesday, March 29, 2011
Oh pick me... again!
My lovely friend, Madeline from The Stamping Studio, has presented me with this lovely award. I received this a few months ago, but figured, I'll try to follow some of the rules and play along again!
Right, 8 little known facts about me!
1. I am on a health kick at the moment!
2. I am still trying to bond with my new house! (six months in and we are still not friends)
3. Yesterday I worked out how to change a downlight - yippee! I can see again!
4. I find kids homework frustrating.... not the actual homework but getting the kids to do it!
5. I am trying to teach my daughter, Miss 8, to longstitch....
6. I cannot knit! Tried and tried and tried, but just can't do it!
7. My sisters are my best friends!
8. I hate cleaning bathrooms
Hmmm... yes I don't think you would have known those things about me, unless you are my sisters....lol!
Now to hand this award on... in no particular order.....
Kristy Strong (sewing related)
Jamie Adcock
If you haven't been over to see their work... get your mouse finger clicking!
Till next time, happy stamping...
Friday, March 25, 2011
I am in love with this project from Inkspirations 4U Spring and Easter sesssion!
You are probably over hearing about Inkspirations 4U Spring and Easter session and I assure you it will be over soon. BUT in the meantime, I have to show you what I have made! After all, isn't that why you come to my blog?
The lovely Marisol gave us a gorgeous tutorial for a pop up box! The picture below shows the box all closed up.
I chose to decorate the top with a lovely rose made from the Ornament Punch. Isn't it adorable? If you have been waiting for the Ornament Punch to become available, you can do a little whoopie dance, as they are back in stock!
Once the lovingly adorned lid is taken off, my butterflies take flight! On the inside you have a stunning little gift card holder! How much nicer is this, rather than a gift card tucked in a greeting card?
So that was take one! I knew as soon as I made it that I would have to do it again soon! As we have a wedding coming up (I know the bride and groom will not see this post), I thought I'd make their gift from this tutorial too!
But first of all, I needed to make a card - truth be known it was the last thing I made for this set, but the first I am showing you!
I made the Heart Punch Bride and Groom by following this video tutorial provided by Valita Reynolds.
And below is my box, which is covered in Bride and Grooms!
Here is a close up! Would we all love to have cleavage like that?
And here is a close up of the inside!
And and full photo of the inside all popped up!
Now this session of Inkspirations 4U is only open for another ten days! So if you want this tutorial you'll have to join quickly. You'll also receive another 10+ project tutorials and some wonderful challenges!
Till next time, happy stamping...
Thursday, March 24, 2011
A cute gift pack!
Today's post is really quick as I have been so busy the last couple of days and I really should be preparing dinner for my family... but I am sure they can wait a few extra minutes!
This sweet little gift case was designed by Madeline Morcelo for the Inkspirations 4U Spring and Easter session. Isn't it just cute! I am ready for the next birthday party that Miss 8 gets invited to! A lot of the ladies also thought this would be super cool if it enveloped a big block of chocolate and I couldn't disagree with them.
Card: Basic Black, Riding Hood Red
Ink: Basic Black
DSP: Greenhouse Gala
Punches: Scallop Border, Scallop Square
Ribbon: 1 1/4" Striped Riding Hood Red Grosgrain (retired), Riding Hood Red Taffeta, Pear Pizzazz ribbon
Embellishments: Large Brad from Hodge Podge
Stamp Set: Punch Bunch (SAB)
Till next time, happy stamping...
Tuesday, March 22, 2011
Two tone challenge!
I've challenged myself of late to enter more challenges. This one is from the lovely site called Creatalicious Challenges. The best thing about these is you get a month to make them.... it's very handy for us busy people!
This months challenge is to make a two tone card. Easy, you say! I dare you to try! It's great fun making sure everything doesn't meld into each other. I think I managed it here, just!
I love using the watercolouring on these roses. Basically you emboss the image on Glossy cardstock with White Embossing Powder. You then lightly spritz the area with water and then you drop ink into each section and slowly work it around. You can change colours and they will gently bleed into each other and create a nice gradual flow with makes your flowers look more realistic.
I also dabbed some Platinum Shimmer Paint onto my flowers once they were dry. They are quite shimmery as you can see by the bottom flower! It was really hard to photograph this. To the naked eye the shimmer is actually a cross between the top and bottom flowers, so not quite so shimmery, but still slightly sparkly. I also used versamark and stamped the flower image on the Very Vanilla cardstock, which was impossible to photograph as well! All in all, I'd say this is a beautiful card, that photography does no justice!
Card: Rose Red, Very Vanilla, Glossy White
Ink: Versamark, Rose Red, Tangerine Tango
DSP: Sweet and Sour
Ribbon: Rose Red 1" Double Stitched Grosgrain (retired)
Embellishments: Circle Fire Rhinestones (retired)
Tools: Heat Tool, White Embossing Powder
Stamp Sets: Growing Green, Well Scripted
Till next time, happy stamping...
Monday, March 21, 2011
Embossed shadows
Hello! I hope you all have had a lovely weekend. I've certainly enjoyed mine! Not much crafting happened, but the kids enjoyed the time spent with them.
Over at Inkspirations 4U we were given this "inkspiration" challenge. These are not normally colours I would go for. But I chose to use them out of this challenge. I even incorporated the red from the telephone in.
We were also given a sketch challenge too, as you can see below. It's kind of easy, so I thought I'd combine the two. It's amazing how much you feel like you've accomplished when you combine challenges. LOL!
So here is my contribution! I decided to try out the embossed shadowing technique that Madeline has shown us over at Inkspirations for you. I inked my Just Believe stamp up with versamark and then coloured the flowers in with Cajun Craze, then stamped and embossed my image with clear embossing powder. I then got a sponge dauber and More Mustard and inked around the images to give a etheral glow! It's not the best photo, but it was very hard to photograph without glare. Grrr!
Ink: Versamark, Cajun Craze, Basic Black
Punches: Small Oval, Large Oval, Scallop Oval
Ribbon: Black Satin
Tools: Heat Tool, Clear Embossing Powder, Sponge Daubers
Stamp Set: Just Believe
Till next time, happy stamping...
Friday, March 18, 2011
A set I was given!
Hello and welcome back. I hope that you found my time between postings a bit more satisfactory this time! LOL! We do have the weekend coming up which means family time, so you may have to wait until Monday for the next instalment!
Anyway moving right along, todays post is a card I made for a Color Challenge over at Inkspirations 4U Spring and Easter session. I don't think these are colours I would grab off the caddy by myself, however I didn't mind the outcome.
And here it is. I have used the Printed Petals Stamp set, which was given (yes given) to us at Convention last year! Now you would think that since I had it three months before it came out in Australia, I'd have used it lots. I am embarrassed to say, I haven't used it since Convention 2010. It's not that I don't like it, but I don't remember it when I am thinking of sets to use!
This card turned out to be a very clean and simple card, which is unlike me, but I do like it alot!
Card: Pear Pizzazz, Rose Red, So Saffron
Ink: Pear Pizzazz, Rose Red
Embellishments: Rhinestones
Stamp Sets: Printed Petals, Sweet Summer (SAB)
Till next time, happy stamping...
Thursday, March 17, 2011
Isn't this cute!
Well, have you been eagerly awaiting the next update of what I have been up to? The Spring and Easter Inkspirations 4U session is in full swing and there are lots of fantastic tutorials and challenges to keep me busy... and you too, if you'd like to join!
This gorgeous basket was designed by the divine Andrea Lowcock! It was super easy to make and I can see someone wanting these as party favour bags.
I really think that Andrea is the original Ribbon Whisperer! She does some fancy stuff with her ribbons and I love the little loops she encourages us to try here.
All the baskets and co-ordinating cards that have been made by members at Inkspirations 4U Spring and Easter session look so different... but you'll have to join to see them all!
Card: Concord Crush, Basic Grey
Ink: Concord Crush
DSP: Lap of Luxury
Punch: Scallop Circle, Heart to Heart
Ribbons: Elegant Eggplant 1/4" Grosgrain, Very Vanilla 1/4" Grosgrain, Pretty In Pink 1/4" Grosgrain
Tools: Big Shot, Scallop Circle Die
Embellishments: Rhinestones
Stamp Set: Oval All
I have been trying to take more time to spend on my other hobby of patchworking and sewing, which is cutting into my blogging time. I'll try to get back more regularly in future.
Till next time, happy stamping...
Monday, March 14, 2011
Are you ready for Easter?
Are you enjoying my daily posts? I hope I can keep them up for you!
Last week one of the tutorials on Inkspiration 4U Spring and Easter session was this adorable little basket from Holly Krautkremer!
In Holly's design she had some lovely eggs from the Easter Blossoms stamp set, but I don't own any stamp sets with Easter eggs in them. So I made a little oval reverse mask and stamped inside it with the Sale-A-Bration Bliss set and then sponged over the top of that. I then cut them out and they are superb!
Card: River Rock, Marina Mist, Whisper White
Ink: Cherry Cobbler, Not Quite Navy, River Rock
DSP: Elegant Soiree
Punches: Scallop Border, Wide Oval, Designer Label
Ribbon: Soft Suede Polka Dot Grosgrain (retired), Marina Mist Satin
Embellishments: Pearls
Stamp Sets: Bliss, Well Scripted
Till next time, happy stamping...
Sunday, March 13, 2011
Starring...
Well this card has been made by an extra special person in my life, my daughter! Miss 8 has become involved in her own Secret Stamper program. I can think of nothing better than teaching kids to give for 'no reason'. She's just started and this is her first effort.
When I saw this Stamping 411 challenge, I just knew it was right for Miss 8's secret stamping friend.
With a little bit of encouragement and help, this is what she came up with. Miss 8 also learnt how to do some watercoloring as well. She has enjoyed being given free reign in mummy's craft room. LOL!
I am super proud of her and I am going to link this post to the Stamping 411 site, even though it's not in the same calibre as most of the others there. I hope they don't mind.
Till next time, happy stamping...
Saturday, March 12, 2011
I finished a challenge on time!
Actually I finished two challenges, although one didn't have a time limit! I managed to combine these two challenges. The first is a colour challenge put out to us over at Inkspirations 4U Spring and Easter session by the sensational Diane Oullette. I honestly think I've found my new favourite colour combo.
I've been trawling the net a bit of late and had noticed some wonderful Mojo Monday sketches about! I really like this one, but nothing was working for me! Until I decided to combine it with the colours above. So I have managed to finish it on time and can actually enter it! Yippee!
I know all this talk, when all you want to do is see the finished result. Well here it is! What do you think? Most cards I make are very feminine or masculine, but this one confuses me. I am leaning more towards masculine, but not overly!
Till next time, happy stamping...
I've been trawling the net a bit of late and had noticed some wonderful Mojo Monday sketches about! I really like this one, but nothing was working for me! Until I decided to combine it with the colours above. So I have managed to finish it on time and can actually enter it! Yippee!
I know all this talk, when all you want to do is see the finished result. Well here it is! What do you think? Most cards I make are very feminine or masculine, but this one confuses me. I am leaning more towards masculine, but not overly!
Card: Pear Pizzazz, Basic Black, Very Vanilla
Ink: Pear Pizzazz, Basic Black, Not Quite Navy
DSP: Greenhouse Gala, Blueberry Crisp
Punch: Scallop Trim Border
Tools: Circle Scissors Plus, Mat Pack
Embellishments: Vintage brads, 5/16" brads (retired)
Stamp Sets: Sense of Time, Elements of Style
Till next time, happy stamping...
Labels:
Elements Of Style,
Inkspirations 4 U,
Sense Of Time
Friday, March 11, 2011
Inkspirations 4U is on again!
I'd guess I should apologise for letting you down and not posting anything much lately. I am still very busy with house improvements and also school committments. We've also had visitors last weekend and are expecting some this weekend, so my time isn't really mine at the moment. Anyway that's enough excuses from me! Let's get onto the fun stuff!
Well Inkspirations 4U Spring and Easter session has started. If you haven't joined I strongly recommend that you do! Each session the tutorials are getting better and better! Can that possibly be? Yes it can!
Todays instalment was designed by the lovely Vimar Serrano. She showed us how to make this gorgeous centrepiece. Isn't it divine?
Card: Blushing Bride, Marina Mist, Whisper White, Vellum
Ink: Blushing Bride, Marina Mist, Regal Rose, Versamark
Punch: Eyelet Border
Tools: Crimper, Circle Scissors Plus
Embellishments: Pearls
Stamp Set: Vintage Vogue
Now I do have few other projects and challenges from Inkspirations 4U Spring and Easter session to show you, but if you can't wait until I update my blog, come and join us at Inkspirations 4U. Not only will you get to see what I've made, but also all the other talented ladies as well, and you can join in the fun!
Till next time, happy stamping...
Subscribe to:
Posts (Atom)