Tutorials

Showing posts with label Cottage Garden. Show all posts

Thursday, May 19, 2011

Two SS - One layout!

Well, I know a little over a week ago, I promised to show you more of what I created for my Secret Sisters.... and I've been slack! But here is the actual first cards that I made for them. As you can see I have used the same layout for the card front...

...but different colours and stamp sets give a totally different look! The first one was for Theresa, who loves Pumpkin Pie (thanks for challenging me to the limit)! The second card was for Genevra! I personally prefer the striking boldness of the second card, although I think it might have been a bit too striking for Genevra.
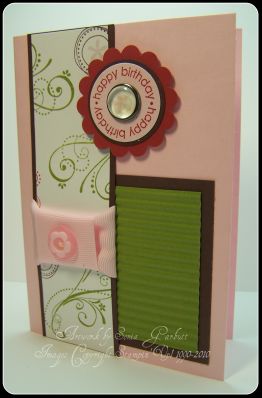

First Card

Card: Pumpkin Pie, Rich Razzleberry, Whisper White
Ink: Old Olive, Rich Razzleberry, Pumpkin Pie
Ribbon: 1/4" Old Olive Grosgrain
Embellishments: Circle Ice Rhinestones
Stamp Set: Cottage Garden

Second Card

Card: Basic Black, Cherry Cobbler, Whisper White
Ink: Basic Black, Cherry Cobbler
Ribbon: 5/8" Black Satin
Embellishments: Rhinestone Jewels
Stamp Sets: Elements of Style, Happiness Shared

Till next time, happy stamping...

Tuesday, August 17, 2010

A pile of pillows!

Sorry for not being here for a wee while - things are busy again! I had my mum visit from Sydney for five days. And boy were we busy! We went to Gemfest, which is a festival of gems - I guess you probably could have gathered that from the name! LOL! We saw lots of fascinating gems and peices of jewellery. Mum and Miss 7 fossicked but only came up with some cracked sapphires that were too small to do anything with! Oh well they enjoyed playing in the dirt anyway!


I had a party over the weekend and the hostess wanted something special on each participants place, so I whipped up these cute little pillow boxes and put some SU!® supplies in them. Very cute and popular!

Anyway I am sorry that this post is so quick... but I have a gazillion things to do tonight. I'll try to get back sooner.

Till next time, happy stamping...

Friday, May 21, 2010

My favourite swap!

Well I think the title says it all! This is the swap I like the most.... out of the ones that I made! That's not to say that the others aren't any good... this is just my favourite. I am truly addicted to the Pocket Silhouettes stamp set. They have worked EVERY time I have used them. I have always been able to make something beautiful!

Today Convention actually starts and we receive our bag of goodies.... get to do some make and takes and also participate in a general session with EVERYONE else that is going to Convention! Bet you wish you were here! Well there, since I have scheduled this post. LOL!


Card: Rich Razzleberry, Pink Pirrouette, Soft Suede, Very Vanilla
Ink: Rich Razzleberry, Soft Suede
DSP: Cottage Wall
Punches: Scallop Circle, 1 3/8" Circle
Stamp Sets: Pocket Silhouettes, Cottage Garden

Till next time, happy stamping...

Saturday, April 17, 2010

OSW - Part 2

Here we go with the second group of cards from this OSW of Linda Cravens. If you missed Part 1, click here!

This selection started off as a 4cm x 14.8cm strip of paper.


I don't know what stopped me from punching all the way along with the eyelet punch, but I liked the effect that I managed to achieve, purely by accident. Sometimes the best creations happen by accident!


I really loved how the Cottage Garden stamp set, matched in nicely with the Bella Rose DSP. Or perhaps it was the colouring? I stamped the salutation in Riding Hood Red and then again making a shadow in Pink Pirouette, although it's a little hard to see in the photo's.


This card gave me the willies, trying to get it right. The strip I started with seemed to be lacking! I decided that it needed something to go around it and this 1 1/4" ribbon seemed almost to overtake it! Trying not to go overboard, I thought that a plain piece of cardstock underneath would be okay - but it was just too boring! So I got out my trusty crimper and rippled the card and it was just enough to take the plain-ness out of the card.

Again I'll list all the ingredients together to alleviate a lot of doubling up.

Card: Pink Pirouette, Riding Hood Red, Chocolate Chip, Old Olive, Whisper White
Ink: Pink Pirouette, Riding Hood Red, Chocolate Chip, Old Olive
DSP: Bella Rose
Ribbon: Pink Pirouette 5/8" Striped Grosgrain, Pink Pirouette 1 1/4" Grosgrain (retired)
Punches:Eyelet Border, Photo Corners, 1 1/4" Circle, Designer Label, Wide Oval, Scallop Border, Scallop Circle, 1 3/8" Circle, 1/2" Circle
Embellishments: Earth Elements Brads, Build-A-Brad Pewter
Stamp Sets:Priceless, Cottage Garden, Best Yet, Think Happy Thoughts

I hope that you have enjoyed this collection and I look forward to showing you more in the coming days.

Till next time, happy stamping...

Wednesday, April 7, 2010

Autumn Winter Blog Hop!

Good Morning everyone!

I hope you’re ready for the ESAD Blog Hop! Better go grab yourself a cuppa as you’ll be hopping for a while!

What is ESAD you say?
ESAD stands for Extra Special Australian (and New Zealand) Demonstrators and it is an online group just for Australian and New Zealand demonstrators for Stampin’ Up!

We so love what we do and not only do we love to share it with our customers, friends and wonderful blog visitors but we share our love for what we do with each other as Demonstrators.

We run swaps, challenges, tutorials, product know how and cyberstamps and we are always there to help and support each other when its needed.


So if you are a Stampin’ Up! Demonstrator located in Australia or New Zealand then please feel free to click here to join our wonderful group.

For those of you who follow my blog, I would just like to say sorry for not being here over the last week. I have been sick with the flu and I have lots of catching up do. I will try to be a bit more consistent in future.

Anyway I thought that I would feature a couple of things today for you. Honestly there are so many yummy things in the new mini catalogue! So here is my sample!

Firstly I thought I'd do a little 'candle stamping'. Using the Cottage Garden stamp set, I made this super cute candle. It looks fab, doesn't it? Have you tried 'candle stamping' before? It's really not that hard. The secret is that you don't actually stamp on the candle. LOL! All you do is stamp on tissue paper and then wrap it around your candle, cover with baking paper and then gently heat with your Heat tool. It's so super easy to do and I am yet to see one that I don't like.


Also I thought I'd make a box to showcase this candle. Now I was having a bit of trouble taking photo's today. Too much glare, so I hope you forgive my crude attempts.

Anyway this box is made using the gorgeous Flower Fantasy Printed Window Sheets, which of course, co-ordinates with the Cottage Garden stamp set and Cottage Wall DSP.

The base and lid of this box are made using the Big Shot Top Note die. I love the different edging this provides. This Top Note die is a must have for scrapbooking, cardmaking and 3D projects. It is so versatile.

The ribbon on the candle and the tag are secured using 5/16" brads, which were available in the spring mini and Stampin' Up!® have carried over and there are still some available.

Below is a picture of the candle nestled nicely in it's special box. I think this is a great Mother's Day present.

Now I could go on all day and create so much using the new in-colour, Rich Razzleberry, and Cottage Garden stamp set. Personally I had been secretly coveting it, when it arrived in the US. But I thought I'd also show you something a lot different. Just in case you aren't a Rich Razzleberry/Cottage Garden fan (could that be?).

Anyway here is a sweet little card made using the Pony Party stamp set. I purchased this set in clear mount. Yep, clear mount. Stampin' Up® have bought out clear mount stamps. I thought that if I didn't like these, my daughter could have them. Sorry Lucinda, but these are mummy's. They are great. So good for storage space. The stamps are still made from rubber and stamp in the same quality as wood mount. There is still an image on the back of your stamp, so you can get placement right.

Anyway back to Pony Party! This stamp set is 2 step. I added the wings, horn and rainbow on the rump. As you can image there are plenty of different options available. There is a party hat, butterfly, hearts, star, flowers and grass tufts to this set as well.

Of course my Unicorn Pony wouldn't be magical if it didn't have bling! So out came the chunky glitter.


Oh I almost forgot, I used Gretchen Barrons Inspiration in Action 123 sketch for this card.

Alright I am getting tired now! So much excitement! I'd better let you keep some energy for the rest of the hop. Your next stop is Susan Joyce who is going to dazzle you with her brilliance and a new punch!

Candle

Ink: Rich Razzleberry, Old Olive, Orchid Opulance, Pale Plum, Perfect Plum
Ribbon: Soft Suede 1/2" Polka-Dot Grosgrain
Embellishments: 5/16" brad
Tools: Heat Gun
Non SU: Candle, tissue paper, baking paper
Stamp Set: Cottage Garden

Box:

Card: Rich Razzleberry, Whisper White
DSP: Cottage Wall
Printed Window Sheet: Flower Fantasy
Ink: Soft Suede, Orchid Opulance
Ribbon: Soft Suede 1/2" Polka-Dot Grosgrain
Punches: Slot, Small Tag
Embellishments: 5/16" brad
Stamp Set: Cottage Garden

Pony Card:

Card: Melon Mambo, Gable Green, Orchid Opulence
Ink: Brilliant Blue, Orchid Opulence, Pink Passion, various Bold Bright markers
DSP: Cottage Wall
Ribbon:Pretty In Pink 1/2" Striped Grosgrain
Punch: 1/2" Circle, 1 3/8" Circle, Scallop Circle, Scallop Edge
Embellishments: Bold Brights Brads, Chunky Glitter
Tools: Tombow Glue, Crafters Tool Kit, Stamp-a-ma-jig
Stamp Set: Pony Party


Till next time, happy stamping...

Tuesday, March 16, 2010

Sneak peak - Stamping 411 challenge

I feel like I have been so busy lately and haven't had enough stamping time - or even worse, time to update my blog! Thanks for your patience.

Todays entry is about a sketch challenge from Stamping 411. As soon as I saw the challenge I knew exactly which papers and stamps to use. Only problem was time! I was away and then visitors came and then I had to spend the day in town, so eventually at 10.30pm, I finally sat down and made this card.


Okay so I knew which papers and stamps to use. Basically I have fallen in love with some of the new in-colours that are to be released here on 1st April 2010. Namely Rich Razzleberry and we are also getting some gorgeous Designer Series Papers to match. And of course, you can't have that without a co-ordinating stamp. Oh boy, I love Stampin' Up! ® for making things come together so easily!


Also on this note, this is just a quick reminder that there are only two more weeks of Sale-A-Bration, which means these adorable stamp sets will not longer to available to receive for FREE.

Anyway I am sure that you'd like to know the names of all these yummy ingredients, so that you can have your order ready for the 1st April 2010.

Card: Whisper White, Old Olive, Rich Razzleberry
Ink: Orchid Opulence, Rich Razzleberry
DSP: Cottage Wall
Embellishments: Fire Circle Brads
Stamp Set: Cottage Garden

Till next time, happy stamping...
Related Posts Plugin for WordPress, Blogger...